In this page:
| Table of Contents |
|---|
Related pages:
| Child pages (Children Display) | ||
|---|---|---|
|
Related pages:
| Child pages (Children Display) | ||
|---|---|---|
|
PROFILES
| Tip |
|---|
Video: Assign Access Profiles |
Access profiles provide users with various levels of privileges and access to different parts of the Lucidity system, ranging from general user access, manager access to system administrators.
| Info |
|---|
Profiles and Roles Assigning a profile to a user will remove all previous role and scope assignments excluding home organisation scoping. Users can only be assigned one profile and these take precedent over any previously assigned roles. The users roles will now be set to match those within the allocated profile. |
Assigning Profiles
Access profiles are created by administrators via the Permissions tab in Lucidity Access. Refer to the Profiles page in this user guide for information on how to create a new profile.
To assign a user a profile, from the relevant user account:
Select the relevant profile from the available drop down
Click 'Save'

Assigning Roles - Advanced Functionality
It is recommended wherever possible profiles are utilised in preference to roles. However there may be occasional circumstances where profiles don't fit the requirements and roles can be used instead.
Access roles are created by administrators via the Permissions tab in Lucidity Access. Refer to the Roles page in this user guide for definitions of each role and the associated privileges.
To assign a user access roles, from the relevant user account:
Select the required module from the tab options

Select the required access role from the list
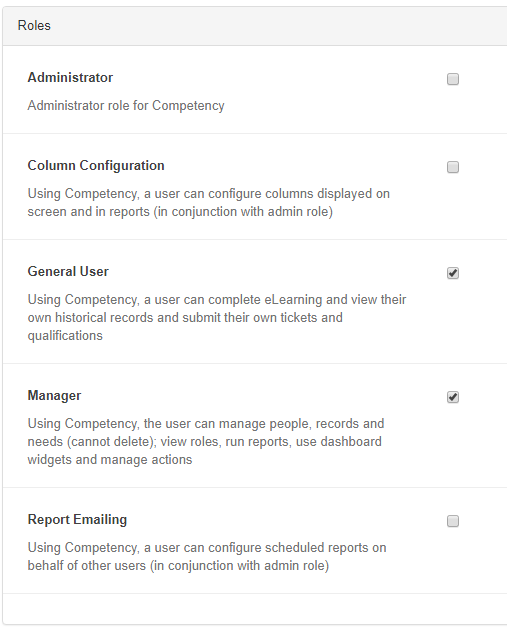
Apply scoping as required. Refer to the Define User Scoping section in this user guide below for more details
Click 'Save'
| Note |
|---|
Editing Roles If a user's profile or role they are assigned changes or privileges in a role they already have been assigned to change, the user will need to log out and back in to the system for the changes to take affect. |
Scoping
| Tip |
|---|
Watch the video to view a 30 minute comprehensive training Webinar focusing on several features from Lucidity Intranet, Lucidity InForm, Lucidity Access and the Lucidity App. Intranet Scoping by Bulk: starts immediately and continues to the 8 minute mark InForm Scoping by Bulk: starts at the 8.40 minute mark and continues for 4 minutes InForm - Asset Integration: starts at the 12.30 minute mark and continues for 5 minutes Using Hyperlinks in Forms and Lucidity App: starts at the 17.30 minute mark and continues for 7 minutes NOTE: This Webinar was recorded in May 2020. Any updates to the features or modules discussed since then will not be included. |
| Tip |
|---|
Video: Define User Scoping |
Scoping can be applied to restrict the information a user can view and manage, typically by organisation. For example, Luke Skywalker may be scoped to view records, forms, incidents etc that relate to the Millennium Falcon project but not those that relate to the Death Star project. Scoping can be used for security reasons to keep records confidential as well as for easier management for the end user. If they have no need to view a particular organisations records, it means there is less unnecessary "junk" filling their page within the system.
Note the scoping via form groups for Lucidity InForm and the various management systems and folders within the filing cabinet for Lucidity Intranet is managed differently and are outlined in detail below.
Points to consider:
Scoping is not mandatory - if no scoping is applied, the user has visibility of all records that fall within their access permissions
Scoping becomes irrelevant if the user's profile only includes the ability to view their own records, forms, issues etc
When assigning scoping, it is important to only apply scoping to the lowest or smallest organisational area
If more than one organisation unit is selected for scoping, the user will see ALL records that match ANY of the scoping selections
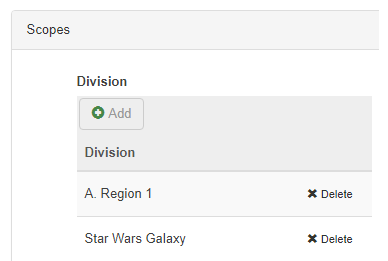
If a division is selected as well as three projects, then the user will see records that match ANY of the selections - the division AND any of the projects
See the image below for an example
| Note |
|---|
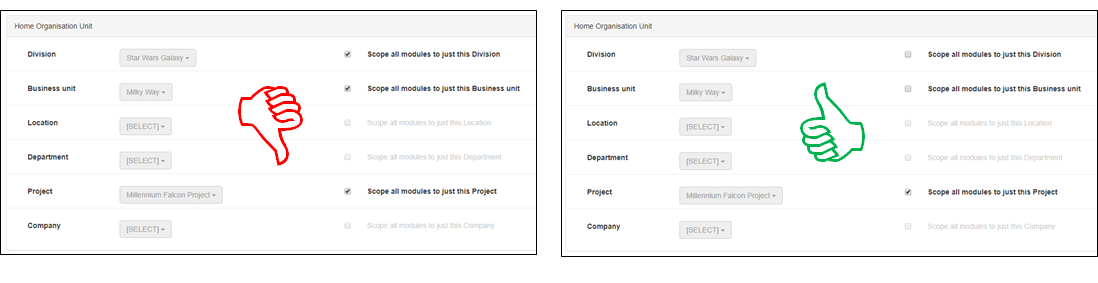
Scope Example Example: Luke Skywalker has manager access roles assigned and can therefore view records other than just his own. He is required to be scoped to only view the Millennium Falcon project's records. In the image on the left below, Luke Skywalker has had scoping applied via his home organisation unit for the Star Wars Division, the Milky Way Business Unit AND the Millennium Falcon project. This will result in Luke being able to view ALL the records in ALL THREE organisational areas - not the intended result. In the image on the right, Luke has had scoping applied to the Millennium Falcon Project ONLY. This will give the intended result and has been completed correctly. Luke's home organisation division and business unit can remain but the scoping has only been applied to the lowest level.
|
Home Organisation Unit Scoping
Typically, users only need to view the records for the same organisation that they are assigned to (their home organisation unit) for all modules. This can be applied from the home organisation unit area in the user's account. This scenario is the most common and can be used in conjunction with profiles.
To assign scoping for the same organisation for all modules, from the relevant user account:
Scroll down to the home organisation unit area
Assign the user's home organisations if not already allocated
Tick the 'scope all modules to just this XXX' for the relevant organisational area
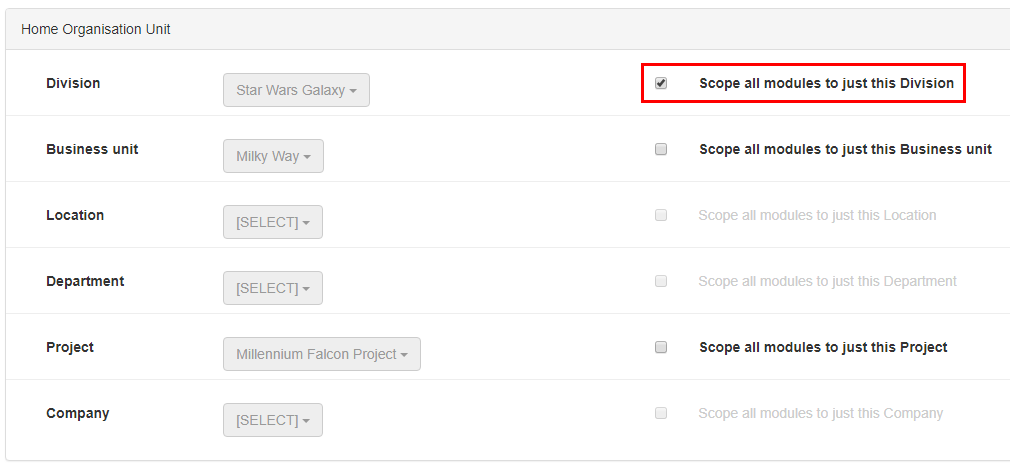
Click 'Save'
This will be viewable in the Scoping section under each module within the user's account


Module by Module Scoping
| Note |
|---|
Profiles are King It is recommended profiles are used, in conjunction with scoping from home organisation unit in majority of cases. Scoping module by module means profiles cannot be utilised and is therefore additional administrative work. The following outlines how module by module scoping can be used in the rare circumstances it may be required. |
Module by module scoping can be used when the user needs access to:
Organisations that aren't part of their home organisation unit
Multiple organisations, such as several projects
Different organisations for different modules. For example a safety manager may need access to the entire company's list of issues in Lucidity Incident but only needs to view their local projects completed forms from Lucidity InForm.
To assign scoping module by module, from the relevant user account:
Select the required module from the tab options
From the relevant organisation or field:
Click 'Add'
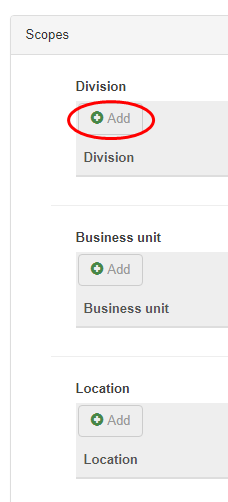
Using the pop-up filter, select the required options - note more than 1 can be selected
Click 'Done'


The selections will be displayed
| Note |
|---|
Actions Scoping It is important to understand scoping in a particular module will impact the user scoping for actions in ALL modules. If a user has scoping applied to only see organisation X in Lucidity HR for example, they will only be able to see actions associated with organisation X in all other Lucidity modules, regardless of the scoping in the other modules. Using the Home Organisation Unit for scoping is the recommended approach and will avoid this complication. This is only relevant for users who have permissions to view actions other than their own. Refer to the Actions user guide for more details. |
Scoping Differences Between Modules
| Tip |
|---|
Most module scoping is by organisational units however there are some variances, outlined in the table below. Note scoping becomes irrelevant if the user is only able to view their own records, forms, issues etc.
Module | Scoping Variance |
|---|---|
Access | No scoping available - administrator access only |
Competency | Scoping can be applied via capability jurisdiction meaning the user will only be able to add and view records or needs for those capabilities allocated to that specific jurisdiction. NOTE: Jurisdiction scoping will override any organisational scoping and is therefore not recommended. It is advised consultation with Lucidity occurs prior to implementing this approach. As users with this scoping cannot view all capabilities, it is common for them to think that a capability doesn't exist, even though it possibly does, just in a different jurisdiction. |
Contractor | Scoping only available via company |
HR | Scoping applied to HR records |
Incident | Scoping applied by organisation units related to the individual issues NOT the people involved in the incident |
Induction | Scoping available via project and company only |
InForm | Scoping applied by organisation units relates to the org units assigned in the individual forms NOT the respondents completing the form Scoping can be applied via form groups, meaning users can only complete and view forms within the scoped form groups Note: It is recommended form group scoping is managed via Access Roles where ever possible to manage group scoping rather than on an individual basis. See the InForm Scoping section below for more details on InForm scoping options. |
Intranet | Scoping is not applied by organisation units but rather by the specific Management Systems and/ or folders within the Filing Cabinet. See the Intranet Scoping section below for more details. |
OnSite | No scoping available - administrator access only |
InForm Scoping
There are several ways scoping can be applied to users for InForm.
Individual Privileges
Typically an InForm general user will only have privileges to view the forms where they are the the respondent to (ie – the person completing the form)
Access Roles above this typically include privileges to view all forms
See the Module by Module Scoping section above for more information on scoping at the individual user level
Home Organisation Unit
When a form is completed, the respondent completing the form selects the relevant organisational details such as a particular division that the form is applicable to. This can be auto populated based on the users HR details
Users can be scoped to only see forms in division A for example
Note that the forms can have a different entity to the user. For example, if a users home organisation is listed as division B but they are completing a plant pre-start form for division A, the form will belong to division A and only those users who have privileges to view division A forms will see it. The fact the user's personal home organisation is division B is irrelevant in this case.
See the Home Organisation Unit Scoping section above for more information
Form Groups
Form groups allow for scoping to restrict specific forms
As an example, there may be a form group for HSE and a form group for HR
Access can be given to the HSE form group which means the user can complete any form within
If access is not given to the HR form group, the user won’t even know it exists and won’t be able to see or complete any of the forms within
See the Form Group Scoping section below for more information
These options can be used in isolation or combined. A user can have permissions to view every single form in a particular form group for 3 out of 5 divisions for example.
Form Group Scoping
Users can be scoped by form groups which means only forms within the selected form groups will be available for completion and viewing. This can be done at the role level (where groups of users can be scoped) or at the individual level (only recommended in an unusual, one-off case).
| Tip |
|---|
Video: Form Group Scoping |
To scope a role to a particular form group, from the edit roles page:
Create the role for InForm as normal, as per instructions in the Access Roles page in this user guide
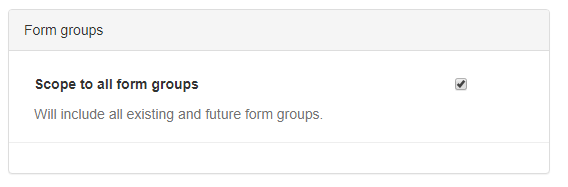
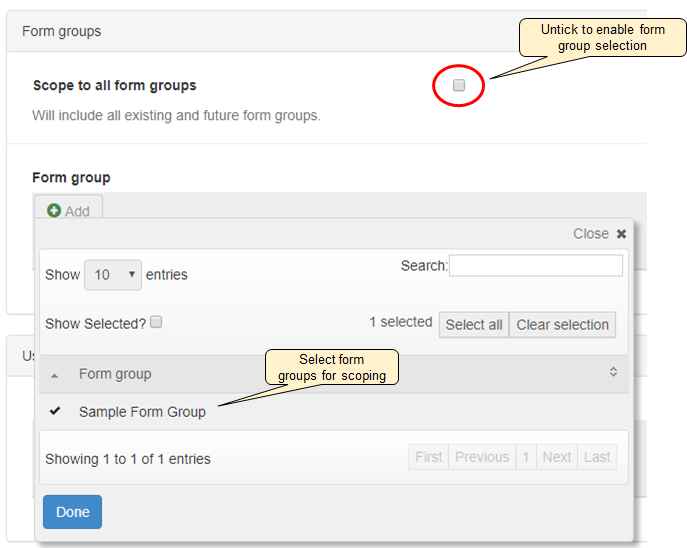
To scope to a particular form group, untick the 'Scope to all form groups' option
By default, the 'Scope to all form groups' will be ticked, meaning all users in the role will have access to all forms
Select all the form groups to be scoped
| Note |
|---|
New Form Groups It is important to note that if new form groups are added in InForm, these WILL NOT be available to any user that has form group scoping applied. These will need to be added to the Access role(s) as applicable. |
| Warning |
|---|
Sum of Form Groups Form Group access can also be given to a user in their individual user account. The form groups a user has access to will be a sum of the form groups in their Access role AS WELL AS the form groups within their individual account. If the Access role has 3 form groups selected and the individual user account has 3 different form groups selected, the user will be able to see all 6 form groups. |
Intranet Scoping
Access roles for Lucidity Intranet do not include viewing or editing permission to any of the Management System pages or any of the folders within the Filing Cabinet by default and need to be specified. Without these permissions allocated, users will not be able to view the Management System or the Filing Cabinet. Users can be given access to the Management System pages and/ or the Filing Cabinet at the role level (where groups of users can be added) or at the individual level (only recommended in an unusual, one-off case).
| Tip |
|---|
Filing Cabinet Permissions
To allocate permissions to a folder within the Filing Cabinet, from the edit roles page:
Create the role for Intranet as normal, as per instructions in the Access Roles page in this user guide
In the Cabinet Permissions section, use the + and - buttons to locate the highest level folder the user is required to access. They will have access to this folder and all it's sub-folders ('child' folders)
Click 'Select Roles'
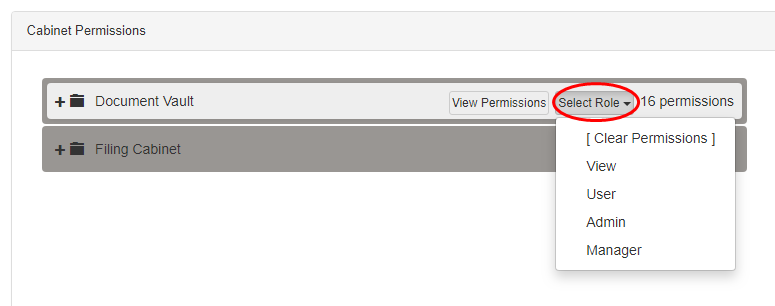

Click 'View Permissions' to view or change the permissions for the selected role
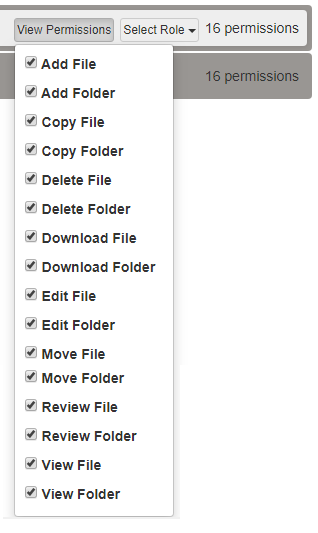
Apply to both the Document Vault and the Filing Cabinet folders as required
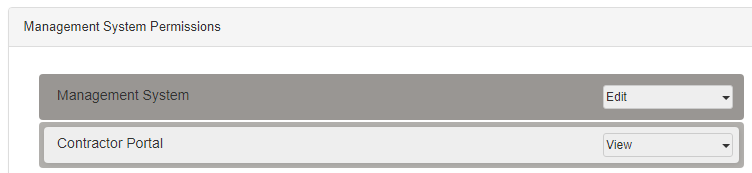
Intranet Management System Permissions
To allocate permissions to a Management System, from the edit roles page:
Create the role for Intranet as normal, as per instructions in the Access Roles page in this user guide
From the Management System Permissions section, apply the required edit or view permissions for each Management System
| Warning |
|---|
Sum of |
Privileges Access to Management Systems and/ or Filing Cabinet folders can also be given to a user in their individual user account. The Management Systems and/ or Filing Cabinet folders a user has access to will be a sum of the permissions in their Access role AS WELL AS those in their individual account. For example, if the Access role has 3 Filing Cabinet folders selected and the individual user account has 3 different Filing Cabinet folders selected, the user will be able to see all 6 folders. |
In this page:
| Table of Contents |
|---|
Related pages: