...
The Advanced tab lets you configure additional image options such as assign it an ID, a class, a language direction, or CSS style properties. It is meant for advanced users with knowledge of HTML as well as CSS, and gives nearly endless possibilities as far as the presentation of the table is concerned.
Below is an overview of all Advanced tab elements:
- Id – a unique identifier for a table element in the document (
idattribute). - Language Direction – the direction of the text in the table: left to right (LTR) or right to left (RTL) (
dirattribute). - Stylesheet Classes – the class of the table element (
classattribute). Note that a table element might be assigned more than one class. If this is a case, separate class names with spaces. - Style – CSS style definitions (
styleattribute). Note that each value must end with a semi-colon and individual properties should be separated with spaces
Working With Tables
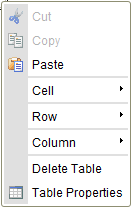
Once inserted into the document, the table can be modified. To edit the table, either double-click it, or open the table context menu by clicking it with the right mouse button or using the Menu/Application key on your keyboard.
To delete the whole table and its contents, use the Delete Table option.
When you choose the Table Properties option, the dialog window of the same name will appear. It allows you to change the configuration options that were set when the table was created, except the number of rows and columns which are grayed out.
Additionally the table context menu lets you modify the rows, columns or particular table cells. This method makes it possible to insert new rows, columns or cells in specified locations as well as merge and split cells.
Editing Table Rows
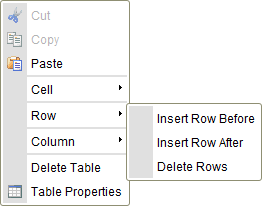
The table context menu lets you edit table rows. If you hover your mouse over the Row menu option, further options become available.
Below is an overview of all Row context menu option elements:
- Insert Row Before – inserts a new row before the one that contains the cursor.
- Insert Row After – inserts a new row after the one that contains the cursor.
- Delete Rows – deletes a row that contains the cursor.
Note that CKEditor makes it possible to select multiple table cells by dragging the mouse over them, so an operation like deletion may be applied to many table rows at once.
Editing Table Columns
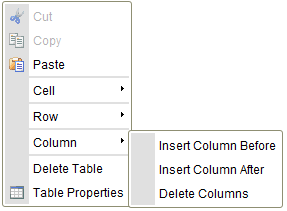
The table context menu lets you edit table columns. If you hover your mouse over the Column menu option, further options become available.
Below is an overview of all Column context menu option elements:
- Insert Column Before – inserts a new column before the one that contains the cursor.
- Insert Column After – inserts a new column after the one that contains the cursor.
- Delete Columns – deletes a column that contains the cursor.
Note that CKEditor makes it possible to select multiple table cells by dragging the mouse over them, so an operation like deletion may be applied to many table columns at once.
Editing Table Cells
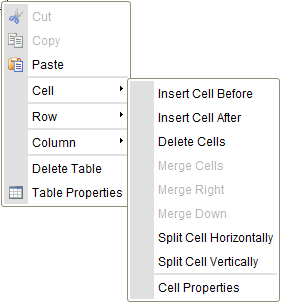
The table context menu lets you edit table cells. If you hover your mouse over the Cell menu option, further options become available.
Below is an overview of all Cell context menu option elements:
- Insert Cell Before – inserts a new cell before the one that contains the cursor.
- Insert Cell After – inserts a new cell after the one that contains the cursor.
- Delete Cells – deletes a cell that contains the cursor.
- Merge Cells – merges multiple cells in one. This option is only available if two or more cells are selected.
- Merge Right – merges the selected cell with a cell on its right. The content of both cells becomes joined. This option is only available if no more than one cell is selected.
- Merge Down – merges the selected cell with a cell located on its bottom. The content of both cells becomes joined. This option is only available if no more than one cell is selected.
- Split Cell Horizontally – splits the selected cell in two, creating a new cell on its right. The content of the cell appears in the original, left cell. This option is only available if no more than one cell is selected.
- Split Cell Vertically – splits the selected cell in two, creating a new cell on its bottom. The content of the cell appears in the original, upper cell. This option is only available if no more than one cell is selected.
- Cell Properties – opens the Cell Properties dialog window that lets you configure cell size, type, color, and content alignment.
Note that CKEditor makes it possible to select multiple table cells by dragging the mouse over them, so an operation like deletion or merging may be applied to many table rows at once


